Creating a Worms movie
From Worms Knowledge Base
Creating a Worms:Armageddon movie is a process that involves several steps. This article will mainly cover the technical aspects of them.
Contents
Preliminar advice
The most important thing when creating a movie is to have a clear idea of what you want it to be like. This includes having a script (a mental sketch of it may be enough, but writing down the story or timeline works even better) and having replay material available containing the moves you're planning to add to the movie. Consider and fetch the music and/or sound effects you want to use. Sometimes ideas are born out of the material you already have, sometimes you get the idea first then create or collect your material, and most of the time it's both.
In the process of making a movie, you will find yourself reviewing your idea and changing details, maybe going back to creating new replays or rewriting the script. This is a natural process that will make your final movie better and more enjoyable. Do not expect your movie to be awesome simply because you're choosing the highest frame rate or the best codec settings. Be patient, take your time and follow the steps. It will eventually come out nicely.
|
The process of making a movie may take a considerable amount of your hard disk space. If you want high quality video, please have in mind that a 10+ minutes long movie can fill a few hundred Gigabytes of uncompressed raw video. You can reduce the space taken by raw video by compressing it before the editing stage, although this may noticeably reduce the final video quality. This will be mentioned later in the article. |
Getting started
From now on, it will be assumed that you already have script and material ready. You will also need the following software:
- Worms: Armageddon installed and updated.
- VirtualDub 1.9.8 (or newer), an open source video processing utility.
- One of the following:
- Adobe Premiere Pro
- Sony Vegas Pro (not Movie Studio, which is a more limited version than Vegas Pro)
- Any other timeline-based video editing software of your preference.
Getting W:A ready for video extraction
.WAgame replay files contain the gameplay you want to show in your movie. W:A will extract video frames using the same interface configuration you have chosen for in-game play. So here are a few things to have in mind before extracting video:
- Disable the background gradient (presing the Insert key in-game), because otherwise it will greatly increase your final video size. Do it unless you really need to display the background gradient, objects and clouds.
- If the replay was played online, you can disable the telephone animation that shows up when chat lines are sent. If you want to do this, open the Phone_Disable.reg registry tweak found in the Tweaks folder.
Creating the movie
Exporting video frames from a replay file
The video extracting feature of W:A allows you to extract video frames from a replay file. Each frame is stored as a PNG file. If your replay file is named TESTVIDEO.WAgame, your video will be extracted to a User\Capture\TESTVIDEO\ folder
Repeat these instructions for every of your collected replay moments.
- Browse to the folder containing your chosen replay file.
- Right-click a replay file, then choose Export video...
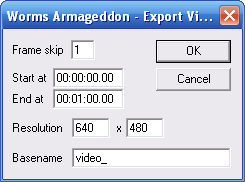
- In the dialog box that opens, fill in:
- Frame skip: If you want the smoothest possible framerate, choose 1 (equals to 50FPS). A value of 2 is acceptable and it will halve used disk space, although it will cut down framerate by half (25FPS). Any higher values will noticeably drop the smoothness of animation.
- Start at/End at: fill in the start and end moments of the particular move, turn or series of turns which you want to extract.
- Resolution: Low resolutions result in smaller video files, but also show a smaller part of the action. High resolutions allow for better quality and broader perspective but take much more disk space. You should choose any resolution as long as you keep aspect ratios consistent between video files. You may choose any resolution supported by your monitor. Recommended values are 800x600 or 1024x768 (4:3 aspect ratio).
- Basename: each frame will be saved using this basename value as a prefix.
- Click Ok to start extracting the video.
- In-game action will be captured, but you may still override the automatic camera by left-clicking and moving the mouse around if you want to focus somewhere else.
Converting frames to video files with VirtualDub
Open VirtualDub. This program will let you merge every extracted video frame into a single AVI file. It also has a batch mode which will let you queue jobs in order to save multiple files in one run.
- Go to File menu, then choose Open video file.... It will open a file prompt.
- Browse to your User\Capture\ directory and open the folder which contains extracted video frames. Select the first frame (usually basename_000000.PNG where "basename_" is the basename value you chose when extracting video) and click Open.
- VirtualDub will automatically load and sort the frames.
- Go to Video menu, then choose Frame Rate.... It will open a dialog box.
- Choose Change frame rate to (fps). Here you will have to enter the FPS (frames per second) value of your movie, depending on the "frame skip" value you chose when extracting this video. Click OK to close the dialog box.
- With a frame skip of 1, you must enter 50. If you chose 2, the FPS value must be 25.
- Go to Video menu, make sure Full processing mode is selected.
- Go to Audio menu, make sure No audio is selected.
- Now you must choose one of these:
- If you're going to use uncompressed video (full quality/huge files), make sure it's chosen by going to menu Video, then Compression.... The option (Uncompressed RGB/YCbCr) should be selected, hit Ok.
- If you're going to compress your video files (saving disk space at the cost of some image quality), follow these sub-steps:
- Go to Video menu, choose Compression.... It will open a new dialog box.
- Depending on the codecs/codec packs intalled on your PC, you may see a list of available choices to compress video. Choose one, choose encoding settings and aim for high quality compression.
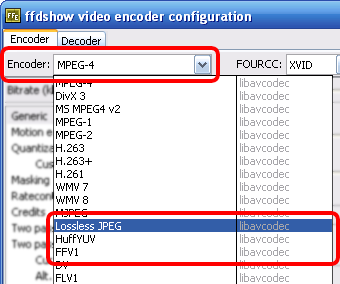
- If you have ffdshow installed on your system, try encoding with MPEG-4 (XVID FOURCC) and a high average bitrate (should be higher the bigger the resolution you chose).
- You can always try with lossless compression (if you have ffdshow, try encoding with Lossless JPG, HuffYUV or FFV1), just make sure that the editing software you use supports the chosen codec. It will save much disk space (compared to uncompressed video) and video will remain at full quality.
- Go to File menu and consider:
- If you are going to encode only one video file this time, choose Save as AVI... and a file save prompt will open.
- Browse to the folder where you'll place your raws, then enter a file name.
- Hit Save and the program will start encoding the file.
- If you are planning to encode more than one video, then choose Queue batch operation and inside Save as AVI.... It will open a file save prompt.
- Browse to the folder where you'll place your raws, then enter a file name.
- Hit Save.
- Repeat steps 1, 2 and 8 for each extracted video sequence. The settings will be remembered for every video as long as you don't close VirtualDub.
- When you're done, go to File menu, then choose Job control.... A new window will open.
- Hit the Start button. The program will start encoding every video file.
- If you are going to encode only one video file this time, choose Save as AVI... and a file save prompt will open.
When encoding is over, you can delete the extracted frames folder(s) in User\Capture\ if you want to, as they will no be longer needed.
Editing
In the previous step you've created the video files needed to add to your video. Now it's time to import them in your favourite video editing tool, so you will be able to organize them according to your script, add effects, etc.
Editing in Sony Vegas Pro
In Vegas Pro, simply click on the Import media... button or go to File menu, select Import then Media.... Browse to the folder where you keep your encoded video files, and select all the files that you're going to add to your movie. These will be added to your media pool, and you can drag them from there to the timeline, into any video track you make.
If you're new to Vegas Pro, it is highly recommended you look for tutorials and FAQs and read them. Learn to use the program and become familiar with its features: panning, zooming, the Trimmer, plugin effects, transitions, generated media, etc. The better you know the program, the easier and nicer editing will be.
Encoding the movie
Either if you want to preview your project or create the final video, you have to properly configure movie encoding. Currently one of the best choices is the Matroska format (.mkv), using .H264 AVC which compresses video greatly at an impressive high quality. You can also choose MP4 as format, which is a very popular AVC container.
Depending on the video editor you're using, you may have more than one AVC codec available. Whatever your choice, it's best to configure it to encode in two passes. Video bitrate depends much on video resolution, and partly on the fps setting.
- Stay with the same fps value you've been using so far. If you choose a different fps setting from value used to encode your exported videos, it is very likely that the movie will show artifacts, i.e. frames partially "overlapping" as if they were transparent.
- A 800x600 movie can use an average of around 2000kbps (and peaks of 3000kbps) and remain at great quality. You should still experiment with values and decide which is the configuration that best suits your goal.
|
Worms videos with an aspect ratio of 4:3 look very nicely at 800x600 (or even 640x480)!
Encoding for WormTube
If you're aiming to publish your video at WormTube, it is recommended that you encode 4:3 video using AVC in a .MP4 format, in order to allow HD video streaming in addition to SD streaming.


