Difference between revisions of "WA Localizer"
From Worms Knowledge Base
m (→4. Translating process) |
m (moved User:StepS/W:A Localizer to User:StepS/WA Localizer: restrictions) |
(No difference)
| |
Revision as of 10:42, 10 August 2011
 | |
| Developer: | Kawoosh |
| Latest version: | 1.0.0.1 |
| Supported games: | W:A |
| Language: | C++ |
| License: | Partially open-source |
| Download: | Release date: 10.08.2011 |
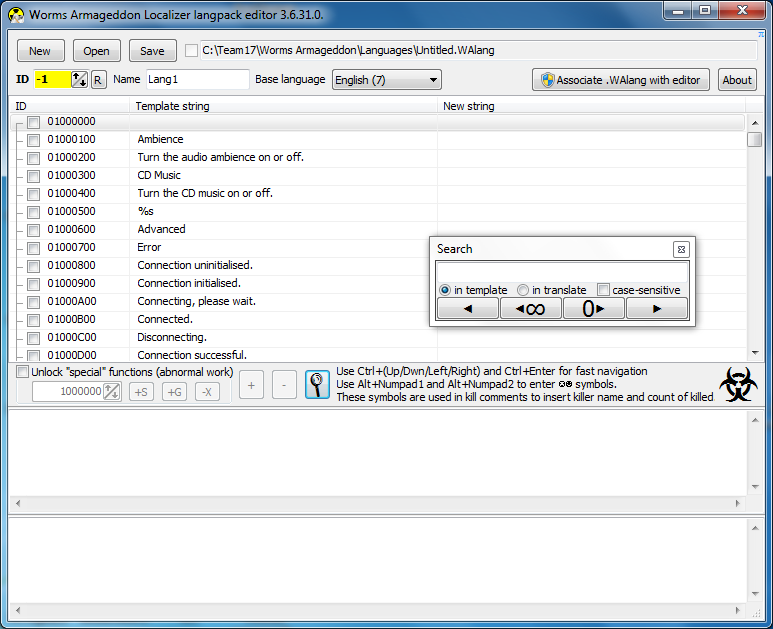
W:A Localizer (or wkLocalizer) is a WormKit module, bundled with an editor, which allows you to fully translate W:A (front-end, ingame, etc.). The langpacks are placed in the /Languages/ folder of W:A directory, and can be choosed from the Options menu.
Contents
Installation and use
First of all, you must have WormKit or WormKitDS installed. Use the installer or extract the archive with files into your W:A folder. Download language packs here and put them into /Languages/ folder of W:A directory. Then run WA and choose your language from the Options menu.
Translating: important tips
1. Choosing the base language
You need to choose the language from which you will do your translation. By default it is "English".
2. Specifying the name for your langpack
Enter your desired name for the langpack. It will be shown in the "Language" section of W:A Options menu.
3. Specifying lang ID, collision issues
You must specify an ID for your langpack. Write your own ID in the "ID" box, or press the "R" button to generate a random one instead. Please note that you shouldn't use IDs from 0 to 8, as they are occupied by built-in languages, and your langpack will replace the affected language. IDs from 0 to 8 are only needed when you want to complete/correct some untranslated (or not) strings in a built-in language (for example, French has untranslated Advanced menu) - then input the corresponding ID and confirm to the warning window. Also note, that you should not put an ID which is listed in this list, as this will cause the problems to people which want to use several langpacks at a time (collision error when starting W:A).
4. Translating process
Begin translating. Choose the desired string and write your translation in the second text field (in the bottom). To finish writing and mark as "translated", press Ctrl+Enter, and you will be switched to the next string. You may also press Ctrl+Up or Ctrl+Down for fast navigation between the strings (it will also mark your current string as "translated" if there was some text inside). The first string (i.e. 01000000) doesn't need to be translated.
Latin and cyrillic letters
Please note that only supported characters will be shown up in the game. There will be no problem if you input an unsupported (extra-latin or extra-cyrillic) letter in your translation, as they will be automatically replaced by the similar ones in the game. Greek, hebrew, arabic, chinese and other alphabets aren't supported.
Special symbols and variables
Please keep all the special symbols and variables that you see during your translation. Examples: %s, ☺, ☻, etc. They are needed to show up, which worm (or something else) is affected during the game. The ☺ and ☻ can also be written by typing Alt+Numpad1 and Alt+Numpad2 respectively.
In-game pop-up messages (i.e. comments)
You may meet some "<<GROUP>>" strings when translating. These are in-game comments, grouped together. The groups are free - you can adjust or delete strings inside them by pressing "+" or "-" buttons respectively. The more elements in group - the more random is their appearance in the game.
"Special" functions
There is a button, called "Unlock special functions". You shouldn't touch this. They are used to add new strings, groups and delete strings. This is for the case if something new appeared in the next W:A Beta release, and isn't present in old Langpack Editor. I don't recommend to use them. "Deleted" strings will still appear in the game as those which they were in the Base Language.
5. Saving and testing
Once you are done with your translation, save it by clicking "Save" into the /Languages/ folder of W:A directory. Then open WA and find them in your Options menu. Please ensure that everything in your translation seems to be fine, then feel free to send me your langpack.
See also
[ W:A Localizer thread on Team17 forum]