Difference between revisions of "The Wheat Snooper/Tutorial"
From Worms Knowledge Base
(→Root window) |
(→Root window) |
||
| Line 22: | Line 22: | ||
These settings let you also to hide your version from others, so you can appear exactly as a Prosnooper2 user or the WA user. | These settings let you also to hide your version from others, so you can appear exactly as a Prosnooper2 user or the WA user. | ||
After setting all up, click on "Apply" and the snooper will then connect to WormNET; if you ever come back to this setting tab, you will be automatically disconnected.<br> | After setting all up, click on "Apply" and the snooper will then connect to WormNET; if you ever come back to this setting tab, you will be automatically disconnected.<br> | ||
| − | [[File:Thewheatsnooper_rootwindow.png | + | [[File:Thewheatsnooper_rootwindow.png|Root window]] |
==Tray menu== | ==Tray menu== | ||
Revision as of 10:17, 29 September 2010
This is a manual for The Wheat Snooper.
 | |
| Developer: | Lookias |
| Latest version: | v2.16 / 28.09.2010 |
| Supported games: | W:A |
| Platform(s): | Windows, Linux, Mac |
| Language: | C++/Qt |
| License: | GPL v2 |
| Download: | [1] |
Contents
[hide]Root window
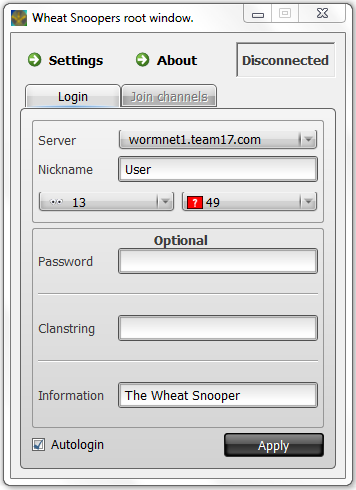
Hello, we start this tutorial, with the root window of "The Wheat Snooper".
You can see several textlines, groupboxes and comboboxes.
The nickname box displays your nickname at WormNET, change this name to everything you want. It has a regular expression installed, so you cannot enter unsupported letters.
The password box can be used for secure registration (currently not needed).
The next are flags and ranks, the clan tag and the info string, which natively is "The Wheat Snooper", so it shows which snooper program are you running.
These settings let you also to hide your version from others, so you can appear exactly as a Prosnooper2 user or the WA user.
After setting all up, click on "Apply" and the snooper will then connect to WormNET; if you ever come back to this setting tab, you will be automatically disconnected.
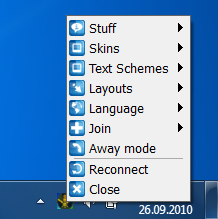
This picture shows the menu which opens when you rightclick the trayicon on your panel.
At the "Stuff" section you can open Settings, open "About" etc.
The skins are chosen on runtime. You can choose several layouts which affect the channelwindows. A leftclick on the tray icon will hide/open the root window.
Host list
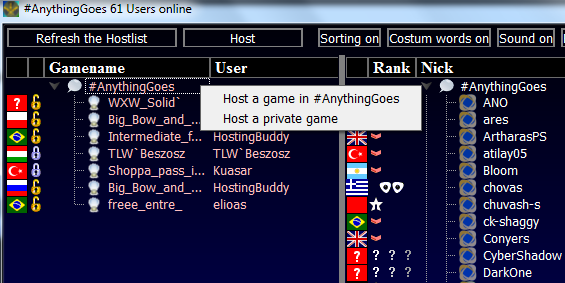
Here you can see a part of a channel window, it's the host list. You can rightclick the channel to host a public or a private game. A doubleclick to a channel will open a public host window.
Choosing a default program
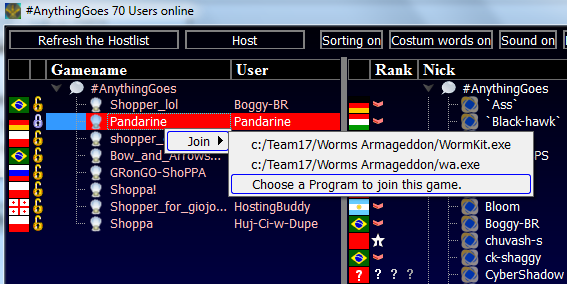
If you rightclick a game, you can choose a program to join that game, for example, WormKit.exe or WA.exe etc.
If you choose a program, the snooper will remember your decision and if you choose a second program, it will show both, but the last program you have chosen to join a game will be on top of the programs list there. So if you double click a game the snooper will join that game with the toplisted program in this list.
Chat
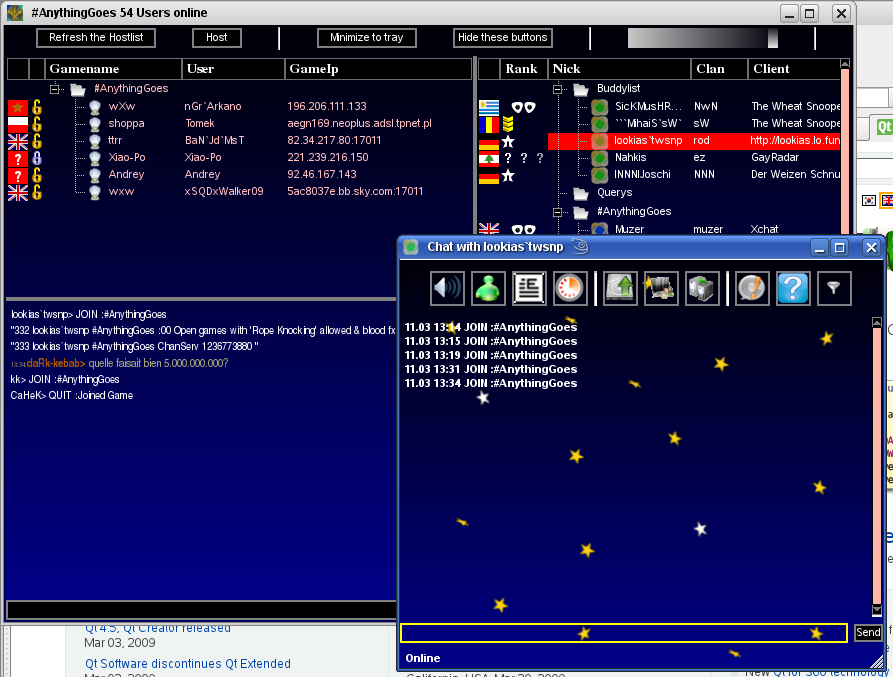
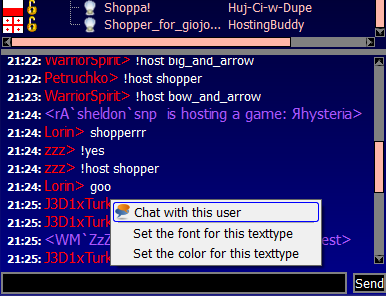
Here you can see the chat, it's amazing in its functionality. As you can see, I rightclicked "Set the texttype". The texttype was a nickname, I can now choose a font, a color and open a chat with this user. If I choose another font, the next nicknames will appear in the new color, the same for the fonts. I can also richtclick on the timestamp and change the font and color of the next timestamps. You see that there are different texttypes, let me list them:
- nicknames
- timestamps
- server messages
- chattext from normal users
- chattext from a buddy
- internet links which start with http://
- game links which start with wa://
- notices
- actions
- privatemessages from normal users etc.
All these texttypes can be set with a rightclick at them.
A gamelink will appear as GAMELINK, with a rightclick you can open a game information window, it shows you the whole gamelink. Also a rightclick to a gamelink lets you to join this game directly. If you host a game, the snooper will write this gamelink to the channelwindow, so people will be able then to join your game over this link, and they shouldn't wait until the game appears in the hostscreen. A http link can be leftclicked and the snooper will then open your browser and show the website, note that web links must start with "www.", "http://", "https://" or ftp:// and they cannot include whitespaces.
List of users and channels
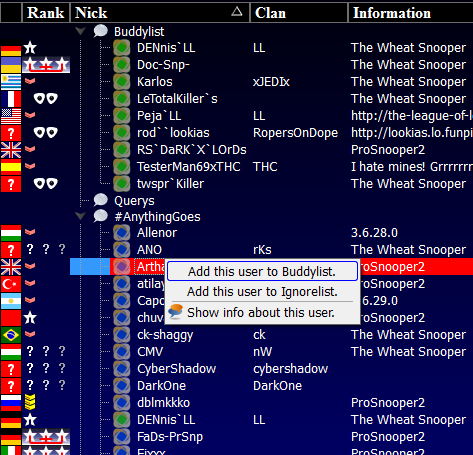
Here you can see the list of users, it provides important features to make your life easier at WormNET. It shows the channels on WormNET and some additional "channels". Buddylist, Querys and Ignorelist aren't the channels, they can be seen as (user) containers with special purposes. At the picture I rightclicked an user, I can now add him user to the buddylist or ignorelist. If I add one to the ignorelist, he will appear there (even if offline). The buddylist will only show this user if he is online, and the snooper will play a sound when a buddy connects or disconnects. Also he shouldn't join a channel to appear in your list, the snooper will show him even if he is at lobby channel. A lobby channel (marked with "*") is a nochannel space where the users are dumped due to not having channel. To skip the lobby channel, you should turn on "autojoin" feature (see the root window).
With a doubleclick at user you can start a chat with him. Users from your buddylist will open a chatwindow when they send you a private message. Users from ignorelist cannot send you private messages. Users that aren't at any list can send you private messages but the message will then appear at the channelchat windows, also the snooper will save the query if you skipped the message. At the Settings, you can also set that the ignored users won't appear at the channelchat at all. But you still can open a private chat with them and talk. A doubleclick on a channelname will open this channel if it isn't already opened. The buddies appear with a green point near their names, and their hosts will appear with a green lamp instead of a white one. Querys from users that are gone will appear with a gray point and ignorelist member with a transparent point. You can sort by flag, rank, nick, clan and info with a click on the header buttons in the list. You can also drag and drop the buttons from the list to change the direction. The default direction is flag-rank-nick-clan-client. So youcan change it for example to: nick-rank-flag-clan-client, etc. If you rightclick a clanname you can choose that this clanname should be hidden, that makes it possible to disable strings that dont seem to be a clanname. If you leftclick a clanname, you will be landed to the clan's main page. Also move the cursor to see a short explaination about the clan.
Private chat windows
Here you can see a chatwindow, it logs the chat and also the server events from this user. This log will be saved to querys/logs. At the settings you can disable the log keeping. Basically, a log for every user is 50 messages. But you can enlarge it up to 99999 at Settings. The chatwindows provide the same functionality as channelchats.
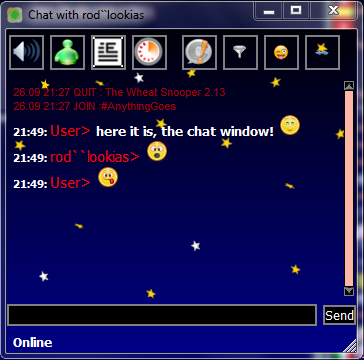
Special commands
You can send notices, actions in notices, (private messages, normal messages), actions, CTCP commands and raw server commands. Sending these messages can be done by prefixing a short string before the message. This string must be the first string of the message.
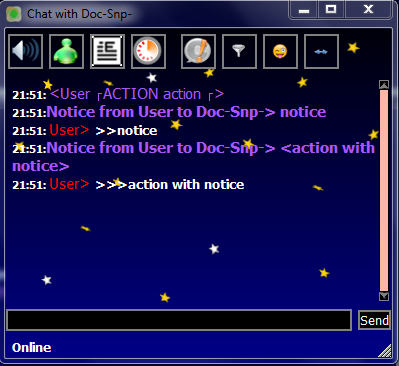
- A notice can be sent with >>, for example ">>hello"
- An action inside a notice can be sent with >>>, for example ">>>is happy"
- An action can be sent with >, for example ">is happy"
- A CTCP command can be sent with >!, for example >!default
- Raw server commands can be sent with /, for example /WHOWAS lookias
The snooper lets you to set CTCP commands that others can send you to receive an automatic message. This automatic message is also settable. For example, you setup the CTCP command 'default' and the message 'this is my default message'. Another user can now send you the CTCP command "default" (with >!default) and he will receive 'this is my default message' from you. This is a poor example, but imagine that you can also respond with messages that include download locations, pictures, website addresses, and everything else that fits into a message. Ok, lets go on with the message prefixes. Assuming that if you wanted to send a notice to a user, you would send it inside a chat window. If you send it into a channel, it will be a notice that arrives to the channel. Normally, IRC clients send notices like this:
/notice user msg
This notice can of course be sent in every chatline. To overcome this difference you can use the raw server command prefix. It will then be the same message:
/notice user msg, also: /privmsg user msg
It can be sent in every chatline. This trick with the raw server command prefix doesn't work for actions and CTCP commands, because these messages need to be bounded with ASCII 1 signs and you cannot type them manually into the chat.
